Application for a Subscriber Permit
Last update 30.08.2022
Natural person
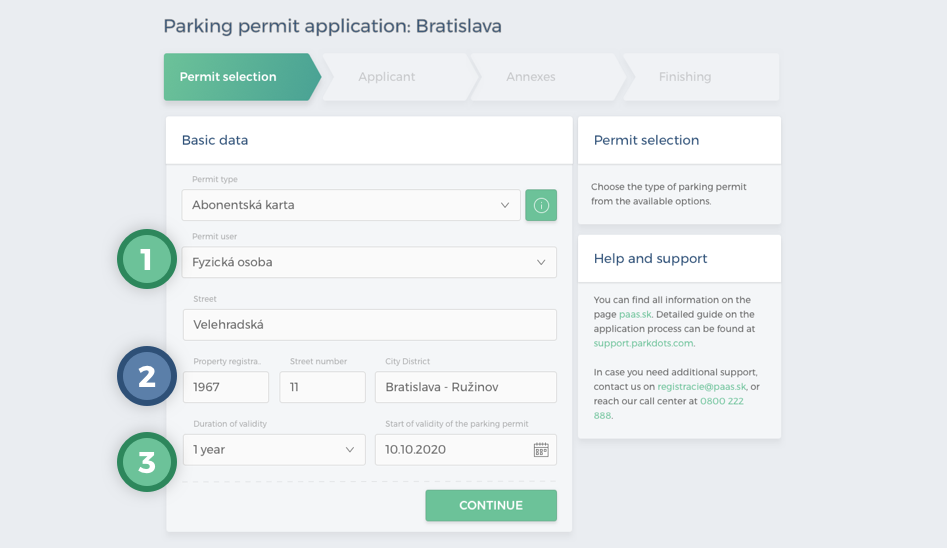
When creating a new application, enter “Abonentská karta” (Subscriber Permit) as a Parking Permit Type. Then in the Parking Permit User section select a “Fyzická osoba” (natural person).
The fields for
entering the address will be displayed. Start typing the name of the street on which you are interested in applying for a parking permit and the system will offer you a
list of streets; click to select.
When you start typing the property registration number, the system will offer you a list of property registration numbers based on the street you’ve already selected. After the property registration number is selected, the system will offer a list of street numbers for the parameters entered. Entering the numbers can also be in reverse order – first the street number and after its selection, the property registration number is automatically filled in.
It is not possible to change the City District, as it is pre-populated automatically according to the entered street. If the user enters an address for which it is not possible to create a subscriber permit, the system will notify them. In this case, it is not possible to continue to enter the application.
The validity period of the permit can be selected from 3 options – 1 year, 1 month and 7 days. You can set the start date of the parking permit to the desired date – later than the current date.
After filling in all the details and the verifying of the address by the system, the user presses Continue.
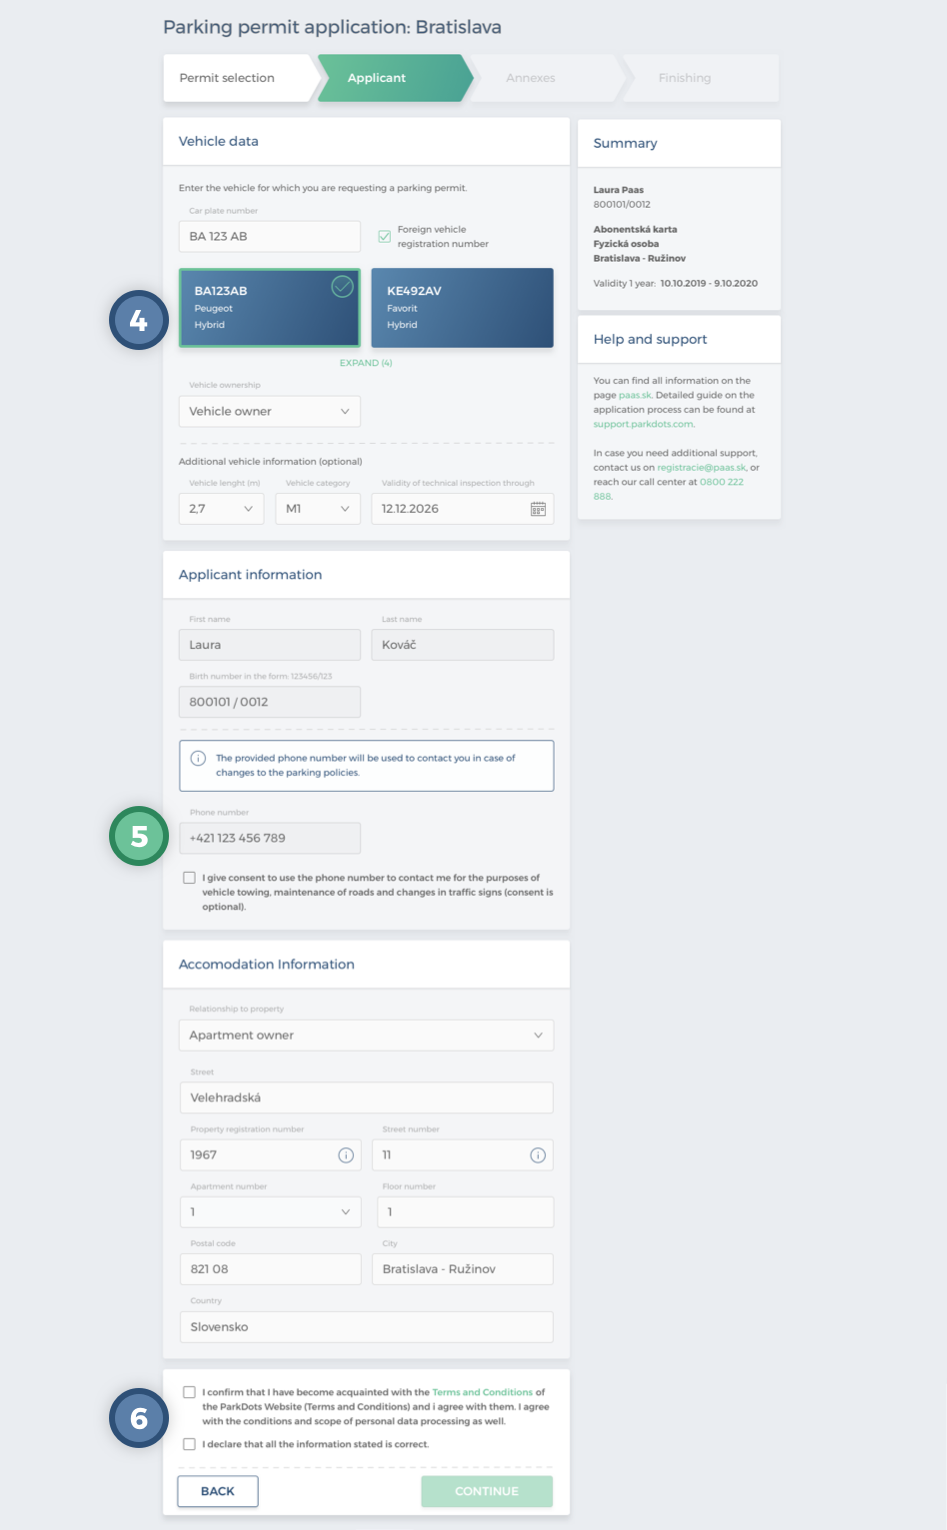
The second step in the “Applicant” screen starts with the vehicle details. Either select a saved vehicle in the profile or enter the vehicle registration number of another one. It is also necessary to describe the relationship to the vehicle or indicate if it is a foreign vehicle or a BEV/electric vehicle.
The user will add a phone number. The other data is pre-populated and cannot be changed by the user. If some of the data is not filled in, this does not prevent the application from being sent. The missing data will have to be added in the Attachments section (otherwise the system will not allow the application to be completed).
Consents that the user must mark in order to continue. Data that is not mandatory for the application is marked as optional; the other data must be entered if the system allows it. The Back action returns the user to the previous screen “Permit Selection”.
Clicking Continue will take the user to the “Attachments” section. Here the system will notify the user to insert the attachments required for the application to be approved. If the system evaluates that no attachments need to be added, the user will be presented with a notification and the Finish action will become clickable.
If the system assesses the need for attachments, the user will insert the necessary attachments either by clicking on the link and then selecting the file from the device or by dragging the file from the computer into the indicated box.

Once the attachments have been uploaded, the user is presented with a window where it is necessary to specify the file type by selecting one or more options.
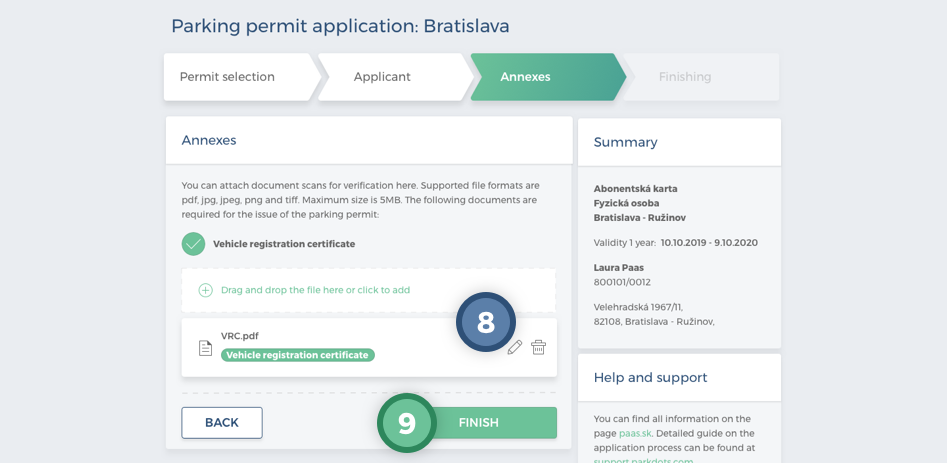
The pencil icon indicates the option to edit the attachment and the Recycle Bin icon indicates the option to delete the attachment.
The Finish action completes the application process.
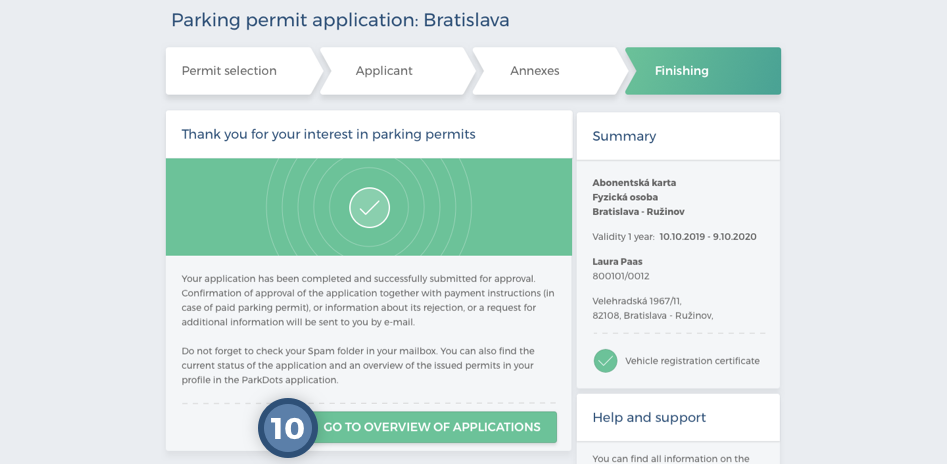
After “Finishing”, a summary of the basic data in the application will be displayed. The user has the option to return to the home page by clicking on Go to Overview of Applications and Permits.

A successfully submitted application will be displayed to the user immediately on the homepage or in the profile in the Applications and Parking Permits section. The user has the option to open its details.
If the system has assessed that verification of the attached documents is required, the status of the application will change to “For approval”. If verification is not necessary, the status of the application will be changed automatically to “Waiting for payment”. It will remain in this status until the user has paid for it (see more in the Paying for a Parking Permit section).
Legal Person
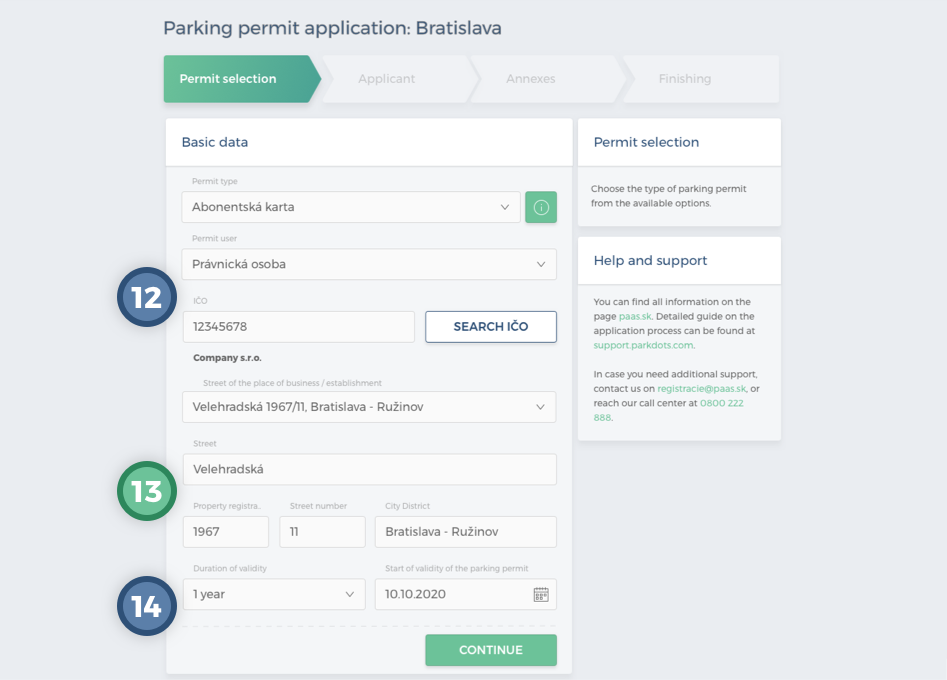
When creating a new application, enter
“Abonentská karta” (Subscriber Permit) as a
Parking Permit Type. Then, in the
Parking Permit User section select
“Iné (Other)”, which means that this is an
entry of the permit for a legal person. In the “IČO” (Registration Number field), the user will enter the Registration Number for which the parking permit should be issued and then tap the
“Search IČO” (Search Registration Number) action.
Based on the Registration Number entered, the system will fill in the address from the register of legal persons. If the system does not find the complete address, it will notify the user and the user will fill in the address manually.
The user starts typing the
name of the street in which they are interested in obtaining a parking permit. The user will select from the list offered.
The user then starts typing the property registration number – the system will offer a list of property registration numbers. After the property registration number is selected, the system will offer a list of street numbers for the parameters entered. Entering the numbers can also be in reverse order – first the street number and after its selection, the property registration number is automatically filled in.
The City District field is pre-populated based on the address entered and cannot be changed. The validity period of the permit can be selected from 3 options – 1 year, 3 months and 7 days. You can set the start date of the parking permit to the desired date – later than the current date. Completion of the data is confirmed by the Continue action.
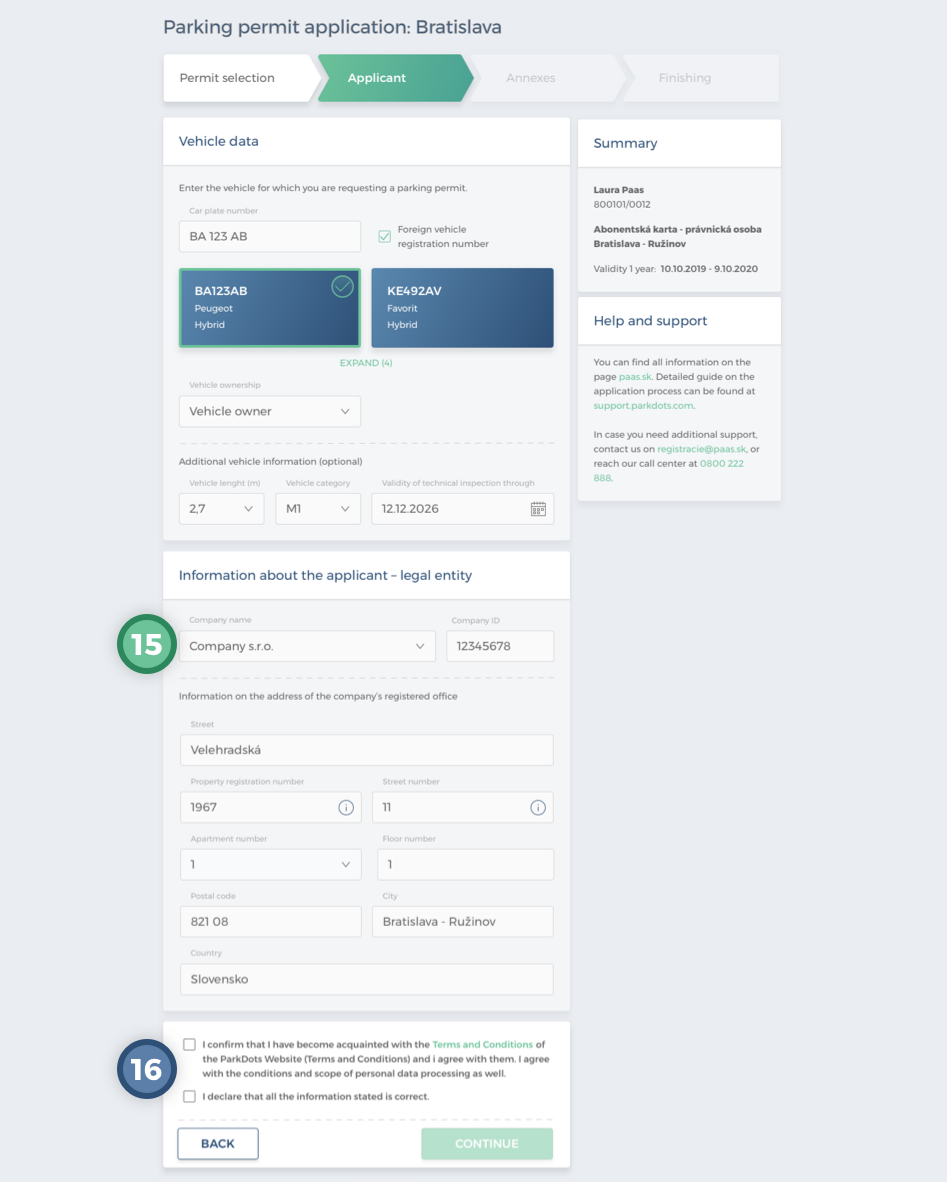
In the “Applicant Information” (legal person) section, all data is pre-populated from the register of legal persons. If the legal person is listed as a self-employed person or liberal profession, the fields about the user (first name, surname) are pre-populated in this section and a telephone number may be added. If some of the data is not filled in, this does not prevent the sending of the application, however the user will have to add the missing data by adding attachments in the Attachments section, as the system will not allow the application to be finished without manually adding them.
At the bottom of the screen, there are the consents that the user must mark in order to enable the Continue action to be clicked. Data that is not mandatory for the application is marked as optional; the other data must be entered if the system allows it. The Back action returns the user to the previous screen “Permit Selection”.
Clicking Continue will take the user to the “Attachments” section. Here the system will notify the user to insert the attachments required for the application to be approved. If the system evaluates that no attachments need to be added, the user will be presented with a notification and the Finish action will become clickable.
If the system assesses the need for attachments, the user will insert the necessary attachments either by clicking on the link and then selecting the file from the device or by dragging and dropping the file from the computer into the indicated box.

Once the attachments have been uploaded, the user is presented with a window where it is necessary to specify the file type by selecting one or more options. By clicking Back, the user returns to the previous step.
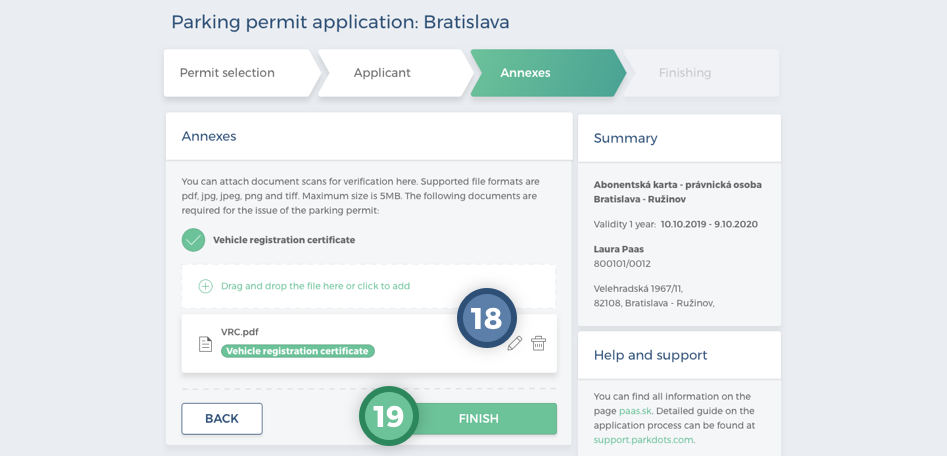
The pencil icon indicates the option to edit the attachment and the recycle bin icon indicates the option to delete the attachment.
The Finish action completes the application process.
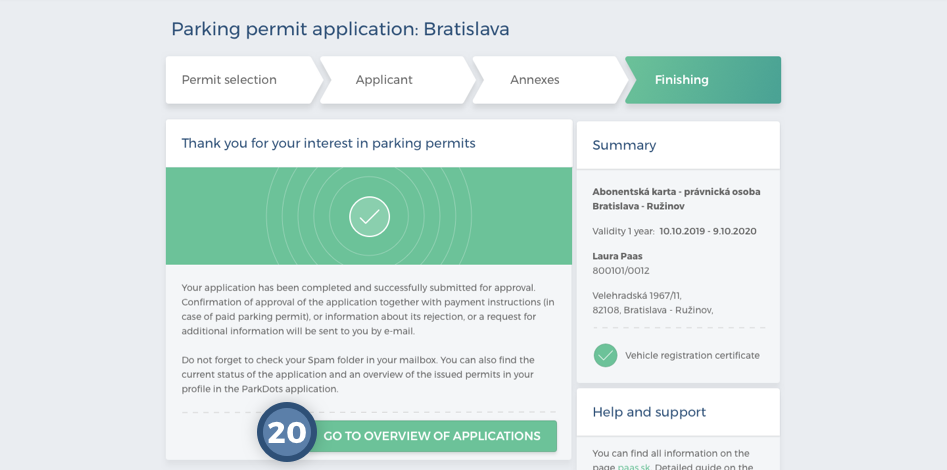
After “Finishing”, a summary of the basic data in the application will be displayed. The user has the option to return to the home page by clicking on Go to Overview of Applications and Permits.

A successfully submitted application will be displayed to the user immediately on the homepage or in the profile in the
Applications and Parking Permits section. The user has the option to open its
details.
If the system has assessed that verification of the attached documents is required, the status of the application will change to “For approval”.


